Wednesday, December 30, 2020

2020 Overview

 2020 sucked and I don't need to tell you why. Despite the high level of suckiness I did have a productive year. A lot of us did because we found ourselves laid off and working on our project lists. I scrolled back through the blog and made a list of some of the things I accomplished this year. Heres a condensed version:

 I built tool boxes. There were three major builds on my toolbox ensemble and two of them were this year. Of course there were a lot of posts about those builds and continued modifications.

 Grandpas table saw got a much needed rebuild. It was one of those things that needed to be done decades ago but just kept getting pushed off.

 I built a much over due parts cabinet that puts all the hardware I own in one location. Its really nice being able to look in one spot for something instead of ten different possible spots. If its not in the parts cabinet then I don't have one and can quit looking elsewhere. Think about it. How many times have you spent twenty minutes looking for a particular screw or nut or rivet? I bet this will gain me a month of free time over the rest of my life. Ya, my mess was bad so at least a month.


 I finally gussied up our front porch. New posts, paint and such. I painted all the exterior doors. I replaced all the screen doors. I painted the roof. I painted all the soffit, fascia and trim. I replaced some siding on the garage and painted the whole thing as well. Oh and I seal coated the driveway too.

 I remodeled the garage. This project started with two new garage doors and morphed into a full blown makeover. Insulation, walls, ceiling, floor paint...the whole works. This is another one of those projects I should have done thirty years ago but who has the time?

 I posted a video on the 5 stages of shop rags and another about a stolen motorcycle.

 Speaking of videos, In October of 2019 I posted my first regular Sunday blog with a video attached so in 2020 I completed my first full year of 52 videos for a total of 63. I still haven't become comfortable in front of the camera but have no plans to quit filming. In fact, I enjoy making the videos more than writing this blog so if Blogger ever goes away I guess I'm set up with a venue I'm ok with.


Later.


Sunday, December 27, 2020

Side Locker Bumper

  I was messing around with the big ass toolbox again and came up with another project. This time it was a bumper to help protect the side locker cabinet. In a busy shop, anything you can do to protect the toolbox is a worthwhile effort.

Check it out:

https://youtu.be/ybMY-V5YafI


Later.

Wednesday, December 23, 2020

It Takes All Kinds...

 ...Of people to make the world go 'round. At work we get our fair share of examples of some very odd varieties. I went through my phone and picked out a large sampling of oddities but decided to limit myself to just one for this post. 

 It started out innocent enough. The complaint was that the recoil handle jerked out of his hand while trying to start the machine, breaking the rope. He was mumbling about warranty. I think when people talk to the counter staff they think they can say whatever they want because the staff isn't smart enough to know the difference. The truth is that they know plenty and many times when I pull a work order they'll warn me about "special customers".


 When I got this particular saw the first thing I noticed was that the recoil rope he used was too thin in diameter. It was also way too short. The next thing I noticed was that this saw was neglected and had probably never been serviced or even blown out. It needed a tuneup and then maybe some of that rope pulling could be kept to a minimum.  

 I cleaned it up and did some basic maintenance along with repairing the recoil. When I called to tell him the saw was ready for pickup the only thing he was concerned about was the recoil. Something must be wrong with it because the handle kept pulling off the rope. He stated he put three knots in the rope and the only way the handle could come off was if something was wrong with the saw. He was expecting a new rewind assembly free of charge and when I told him I just replaced the rope he about lost his mind. 

 "How many knots did you use"?

One.

"What? Thats not gonna work. I had three knots in that rope and it still pulled through the handle". (as seen in the pic above. I saved the rope as a reminder)

Sir I'm confident in the repair. You should be all set to cut some wood.

"I'm not happy about this. What happens if I pay for this and it breaks again"?

I explained that he was putting undo stress on the starter mechanism because the saw was lacking in maintenance. Thats why the rope broke the first time. The rope was so short it would come to the end of its length before the pull was over, thus jerking the handle out of his hand. I also told him we would be happy to go over maintenance with him when he picked up the saw and that if it broke again we would stand behind our work and fix it free.

"But I had three knots in the rope and it still pulled through".

This went back and forth a few times and I didn't know if I could hold back. Here was a grown ass man with a drivers license and a job. Probably even raised some kids. How could he not figure this out? I took a deep breath and found an opening in his verbal rampage to tell him this: 

Sir I saw what you did. You put three knots in a row. Because you chose a rope that was too small in diameter the handle pulled through the first knot and there was no reason why it wouldn't pull through the second and third knot because the knots are all the same diameter. We use a special recoil knot thats much bigger in diameter. I'm sure the repair will hold.

I guess he just needed to know he was getting the "special" knot because he came and got the saw weeks ago and I haven't heard back from him. BTW, there really is a special knot but I'm not authorized to reveal its secrets.


Later.


Sunday, December 20, 2020

Office Slide Out Doohickey Thingamajobber

  Like the title says, this weeks video is about the office slide out doohickey thingamajobber. Hey, you got a better name?


Check it out:

https://youtu.be/ZGGvAbo_MV0


Later.

Wednesday, December 16, 2020

Fixing Damaged Threads

  Working on chainsaws and other small 2 cycle engines means I deal with a lot of soft lightweight materials like aluminum and plastic. Because I deal with them every day I have a pretty good feel for when a screw is tight enough but not all my customers have that same feel. I get a lot of people that think "crank it till it strips then back off a quarter turn" is a real thing. They then bring it to me and ask if it can be saved. Pretty much all stripped threads can be saved but a lot of times the deal breaker is the amount of labor it takes to restore the threads. Is the bolt broke off in the threads? If so is the broken face flat so drilling is possible? Is the bolt exposed or recessed? Did the bolt vibrate out and leave a sloppy hole? All of these things require a different method of repair. 

 The following repair came across my bench yesterday. One bolt was holding the muffler on and the other was broke off just below the deck surface. A lot of times these bolts can be walked out by drilling a hole and using an "easy out" extractor. Some times a left handed drill bit is all thats needed. In this case it appears the bolt was cranked tight against the bottom of a blind hole and would need to be drilled.

 Don't adjust your picture. The saw was laying on its side on the bench. The upper muffler bolt hole is our concern.


 I taped the exhaust port to keep debris out of the engine. I center punched the bolt shank as best I could.

 The next step is to drill a nice straight hole through the bolt. I like to start with a small bit and work my way up.


 At this point I did try an easy out extractor just to see if the bolt would move but it was tighter than a camels butt in a sand storm. The answer would be to either drill it to size for a tap or drill it for a thread insert. Thread inserts have worked well for me.

spiral extractor

"Perma-coil" thread insert kit

Our new threads

 The kit requires drilling to a specific size depending on the insert being used. That hole is then tapped for the insert. Next the insert is put in a special holder that is held against the top of the hole while being turned in. Its all pretty easy.

 That blue piece is the holder and a driver runs through it turning our insert. Below is the finished results.


  "Why not just drill and tap for the next larger size bolt"? Sometimes that works but in this case a larger bolt would not have fit through the muffler.
These kits work pretty well and make a permanent repair for the original size bolt. The steel insert holds up better than the original aluminum threads and the only time I see come backs is on some sketchy spark plug thread repairs that probably shouldn't have been done in the first place but the owners felt any attempt at more run time was worth the effort.
 
Later.


Sunday, December 13, 2020

Hidden Toolbox Storage

  If you've followed any of my videos then you probably know my work toolbox is a bit like Frankenstein's monster. It has bits and pieces from many sources but it all kinda fits together. Kinda. Todays video addresses a two inch gap that has been bothering me.

Check it out:

https://youtu.be/qkge1150sCE


Later.


Wednesday, December 9, 2020

Time To Vent

  No I'm not pissy about anything and don't need to get anything off my chest. This post is actually about vents. You know, an aperture that allows the movement of air. Just go with the flow and follow along.

 I'm storing the Ultra in my enclosed trailer and last year at some point I opened the door and noticed the bike was sweating. I don't think it was because he got caught looking at pictures of curvy roads but rather he was a victim of condensation due to differences in air temp between the inside and outside of the trailer. I told myself I'd vent the trailer for this year and did just that.

 Do I need a power vent or just a couple of grated openings? I turned to the internet for some answers and found a range of opinions that left me with more questions than before I began this project. I finally decided the right thing to do was add a pair of waterproof vents that would allow a cross flow of air in the trailer. I also decided to get a small fan to help move things along. The fan is a heavy duty project fan like you find in a desktop PC console.

 First I needed to drill a couple three inch holes in the sides of the trailer walls. Those holes were then filled with the grate that came with the two piece vents.


 The outer piece keeps the rain out. It was caulked and screwed to the outside over each grate.


 I already had power running to the trailer for the trickle charger so I just ran a power cord to one vent where I'd install the fan. 


 Ya I know its not a very neat job of routing the wires so lets just keep it between me, you and the rest of the internet.

 The finished project looks fine from the outside. 


At first I didn't know if that little fan would make any difference but it sure seems to move a lot of air. I'll be sure to check in on the bike more often this winter and see if my efforts were worthwhile.

Later.

Sunday, December 6, 2020

Will It Fit?

  Now that I have a snowplow on the front of the big ass station wagon I sure would like to be able to park the combination in the garage. I also want to be able to mount and dismount the blade while its in there.


Todays video answers the question "will it fit"?

https://youtu.be/JUp9hluaYcQ


Later.

Wednesday, December 2, 2020

The Big Reach

  Project ideas come and go. As I stumble through life I manage to dream up a lot of projects that are just fun or maybe a learning experience or an exploration. The best projects are the ones that fulfill a need and lately I've been struggling with "the big reach". The big reach may also involve crawling on my knees or jumping to the ground. What am I talking about? 


 If the picture doesn't explain it then I will. Reaching from the liftgate toward the front of the truck for an object just out of reach can be difficult. With my last truck I used a broom to drag things to the rear. My 50+ pound toolbox won't drag on carpet and anyway I should be smart enough to come up with a better way. 

 Bed slides are the answer. In fact bedslide may be a brand name of a truck bed insert that is on rails and just pulls out allowing access to the entire load. I need one of these in my life to save my aching knees. Because I'm a gearhead on a budget I can avoid the $1500+ investment of a store bought unit and just build exactly what I want. 

 The absolute cheapest way to build one is to just let it slide on the carpet. The problem with that is you can only pull it halfway out before it will want to tip forward. Thats a fail when I consider some goals I've set which include:

-Full extension slides so the furthest back pieces on the deck slide out to the tail gate.

-Low deck height. I don't want to build a slide system that ends up raising the deck height more than 4" off the existing carpet.

-Use of available material. I'm struggling with this one.

-Low cost, after all I'm a gearhead on a budget.

-The possibility of a stow away ramp

-Easy removal. I don't want this to be so permanent that replacing the third row seating isn't an option. 

 Ideas come and go and often get revisited. I'm not sure what the trigger is but sometimes a rerun idea just gets stuck in my head and the only way out is to build it. A bed slide is stuck in my head so stay tuned for updates on this project.

Later.

Sunday, November 29, 2020

Big Ass Station Wagon Gets A Snowplow

  Yep, I'm sick of working twelve plus hour shifts plowing snow at work just to have to fire up a snow blower when I get home and clear my own drive. Sure I'll have to put my big boy pants on and clear the walks if I get to them before my wife does but I'm ok with that. We sell a couple brands of snowplows at work and I was able to make a deal on a non-current blade that we had left over. This was really the only way I would have ever considered the purchase of a plow because I only plan to do my own drive and it will never earn any money to pay for itself.


 The video covers the install process and what had to be done to make it work on a lifted truck. As for the blade itself, it seems well built for a homeowner grade blade. If it gives me grief I'm not too worried because I have access to a torch and welder and have plenty experience building mounts for heavier equipment like tractors.
 Check it out:

Later.


Wednesday, November 25, 2020

Photo Dump

  Nothing interesting to report so today I'll do another photo dump from my phone. Why I save some of these pics is beyond me.

 This first pic is of an Oreo cookie. I'm sure these are assembled by a machine but what kind of flipping and flopping around of these cookie halves is going on over there? I pay a premium price for a supposedly premium cookie and expect them assembled correctly despite the fact that they taste just the same no matter how assembled. I'm sure theres an inspector that ensures each creamy filling has two halves no matter how they are oriented. Send it! They'll eat it...and I did.


 The next pic is proof that you should always expect the unexpected. I mean really, who would think you could break a half inch drill bit with a battery powered drill. This broke purely with Chubby Checker twist action. None of that Elvis hip shakin led to this failure.


 As a dealer mechanic I see a lot of warranty claims and also a lot of claims that have nothing to do with warranty. What I mean is that we often get a customer that brings their broke ass equipment in along with their proof of purchase expecting a free repair. A lot times its easy to show the customer what they did wrong. When called out on it they always say that they lent it to a neighbor and this is how they got it back. I give them a bill, they bitch, I tell them to get their neighbor to pony up some cash. 

 I want to take a moment to say that there are still some good people in the world. Every so often a "neighbor" will bring in a piece of equipment he borrowed and screwed up. Usually these people just want to make it right no matter the cost and I do what I can to keep those costs down. 

Handheld blower with nylon stocking wrapped
 around crankshaft end. Not a warranty claim.


 The next shot is also from a handheld blower I believe. Its for reference only. Look close at the black plastic crankcase cover.


 Heres a closer look. It took me a few minutes to realize what had happened here. There is a hole worn completely through that cover. How could the crank travel that far over to hit the cover? Well it can't but if the press fit crank pin is no longer a press fit then it could slide over and cut through that cover. You can see the rod bearing through the hole that was created. This repair was a warranty claim.


 Concrete saws and chainsaws work in dirty environments. If you neglect air filter maintenance then you can expect to trash the equipment. This $1200 saw is a parts donor now because someone assembled the air filter on wrong.


 Last time I sealed my driveway I used a squeegee to spread the sealer and used four five gallon buckets. This year I planned on using a brush so I bought and extra bucket. I should have bought two extra buckets. Missed it by Thaaaat much.


 As I write this I'm sitting in my recliner wearing headphones and listening to my favorite jams while tipping back a cool one. My decision to do a weekly video is a whole lot more work. Coming up with an idea, setting up the shot, lighting, audio, not sounding like a total dork, editing and posting all add up to a lot of time invested. This was a pic I snapped during the last video. When I was done shooting I had to clean it all up and pull the car back into the garage. Is it worth it? I don't get paid for youtube videos so the only worth is the enjoyment I get from doing it. When it stops being fun then you'll stop seeing videos.


Later.


Sunday, November 22, 2020

Automower Storage Tips

   Besides fixing chainsaws, weed wackers, blowers and being an all around great guy, I also work on robotic lawn mowers. Todays video is a walk through of what a homeowner needs to do to prepare their automower for storage. If you don't own an automower then this one might be a yawn fest for you. On the other hand you might actually learn something. 


https://youtu.be/Ao02ZB3p6X4

Later.

Wednesday, November 18, 2020

New Skins

  Finding material for this blog can sometimes be difficult but I suppose anytime you drop a grand on tires its worth talking about. In truck terms $1000 isn't much for decent tires but I don't own a truck. I own a wannabe truck that takes the shape of a big ass station wagon. Actually I've been really happy with the Yukon XL and should have bought one of these a long time ago.

 Two years ago I put a 3.5" lift on the Yukon. It took that long for the tires to wear out and now it was finally due for new skins. Originally I was looking at a mud terrain tire. Partially to deal with deep snow and partially cuz they look bad ass. The practical side of me knew mud terrains weren't a wise choice but I kept on pricing them. I was considering a low cost set of tires that would not have lasted very long but would have been "cool". Along with cool you usually get noisy, hard to balance and poor handling.

 I said deep snow earlier. I plow snow at work and I have to drive twenty miles to get there, If I'm doing that at 1am then theres a fair chance the roads are crap. Many times the county has pulled the plow trucks earlier in the evening and I still have to figure out how to get there without ditching it. One tow truck call could easily cost more than the difference in price between cheap tires and decent ones.

 There are a few tires out there I've always wanted to try. BFG mud terrains are one of them and I put some on that blue Dodge I had last. They were good from a traction standpoint but were noisy and handled crappy. Cooper Discoverer STT is another tire I want to try but I couldn't find the right size for the big ass station wagon. The General Grabber ATX is something I've seen around and when possible I've asked the owners how they like 'em. I always got a positive answer so when our local tire distributor said he could get them for the same price as the best internet price I found, well I said ok.


 James and I mounted the tires last Saturday. They balanced well without too much weight needed. They handle well on the road and are only slightly noisy. Actually the most noise I heard was when one of the front tires was rubbing on my mud flap. I went one size taller than stock and had to take an angle grinder with sanding disc to that mud flap. All is better now. With a 60,000 mile rating and an aggressive all terrain tread pattern I think I'll be happy with these tires.

 I seem to get more practical as I age. I'm not sure if I'm ok with that but we'll just roll with it for a while and see how it plays out.


Later.

Sunday, November 15, 2020

Up Valve Break Down

  Not long ago I showed you some work I was doing on my Harley. The air ride suspension was having problems with moisture and I added a water separator. Theres still water in the system and the other day it fouled my "up valve" again.


 We had some wonderful weather last weekend and this video was taken during a sunny, 70 degree November day in central Wisconsin.


https://youtu.be/y11OKFFxht0

Later.

Wednesday, November 11, 2020

Raising Sodium Levels

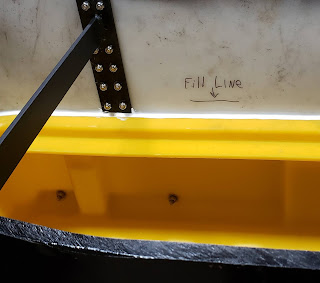
  Not long ago I showed you a John Deere tractor that was getting a v-blade put on the front of it. That same tractor now has a drop spreader on the back. The problem in the past has always been that there isn't enough capacity for salt in the hopper and the operators are carrying extra bags in the cab, on the fenders and even strapped to the hood. Theres no doubt they are gonna haul the extra weight so we decided to just try to get that needed capacity in the hopper itself. This is a plan that will surely back fire as we've taken the rated capacity of the three point hitch and added 10% assuming John Deere must certainly have a fudge factor built into their numbers to please the lawyers. I have a vision of the hopper being filled up AND the extra bags being loaded on the tractor which would most likely end up resulting in broken parts. The mentality seems to be we should crank on it till it strips and then back off a quarter turn. Once we know the limits we can work within them. In an effort to minimize damage to the machine I'm trying to arrange staging pallets of bagged salt near the work site but what I'd really like to do is stage bulk salt. Anyway, this isn't about stashing salt around town where it won't grow legs and disappear. Its about a lift kit on a salt spreader. Here is what we are starting with:


 That white piece of plastic is the stuff used to line dump truck beds so crap slides out better. Its 1/2" thick and quite rigid.


 We used a torch to heat the plastic enough to bend it. Some bends were heated in place and others on the bench. Once heated enough to bend, the plastic retained its heat and flexibility for a long time. Once cooled it was permanently set in that shape.


 We needed ten feet but only had eight. This meant an extra seam.


 Those seams were made of steel and we used them to tie a cross brace front to rear. Strength won't be an issue. Here is the finished project.


 As a joke I drew a "fill line" inside the hopper only about an inch above the stock fill height.


 I guess the joke is on me. When I saw the operator looking in the hopper I thought he was just discovering my attempt at humor. Actually, he had his own sharpie and was making some adjustments.


Later.

Sunday, November 8, 2020

Tool BOX Tour

 Now that I've split this blog into what you see here and a YouTube channel, it seems I have two separate audiences. Many of the followers on YouTube are gear heads and into tools. So am I so you'll continue to see videos like this. I've done a bunch of individual videos on the tool box build and to be honest I'd like to do a lot more but for now I just wanted to do a single video that included most of the features I've built into this project.


 I capitalized the word BOX because this video isn't about whats inside. Its about the box itself. Its true the tools inside are what makes the money so building much of the box myself and saving some coin helps fill the box with goodies. Check it out:


https://youtu.be/cQM1jT86zv0

Later.


Wednesday, November 4, 2020

New Sidewalk Tractor Update

  Last week I showed you a video about our new John Deere 2025R that we are tooling up for a sidewalk snow and ice rig. If you remember, the blade mount was complete but the blade didn't sit level. Here you see the blade attached to the tractor in a fresh set of mount holes.


 It was as easy as moving the bottom hole on the mount to the top hole on the tractor and then adding a new set of lower holes on the mount.


 I say drilling six holes in 3/8 steel was easy because it really was effortless. If you look closer you'll notice that there is a mag drill inside the pocket of that mount.


 If you're not familiar then I'll explain. This drill is like a mini drill press. The base is an electro-magnet. Line up the bit with your marked hole, flip the switch and the magnet is activated. Its a strong magnet and it takes a bit of stupidity to run into a problem. The bit is not a typical drill bit but rather an annular cutter. These things eat steel quicker than an unsupervised fat kid can tear through a bag of halloween candy. I look for excuses to use this tool just because I like how well it works.

 When building a rig for a specific task there are usually certain dimensions that it has to meet. We drove it out to the city sidewalk to see how it fit. The look on my bosses face was the same one I've seen in the mirror after getting off the scale during the holidays. Too big and needs to downsize. Our V-blade didn't meet the needs of our sidewalk tractor because sidewalks are 48" wide and this thing was well over 50" even in the V position. This meant it would either peel sod back or ride up on frozen turf. Neither situation is acceptable so we set out to narrow the size of the blade. Besides the width on a sidewalk we needed to consider that this rig will be used at a factory where a building borders one sidewalk edge in many places. The issue there might be less obvious but without going into great detail it has to do with scraping a new tractor with glass doors along a brick building. If the blade is too narrow the tractor gets too close to the building. Once we came up with a compromised size the next step was to start disassembling and cutting. I'm not sure what Dan was grinding here but it seemed like a good spot for an action shot.


 In this shot you can see how much we narrowed the blades. 


 To just say we narrowed the blade is an understatement. We reused everything on that cut off piece and welded it back on to create a factory look. Double the amount of cussing you think it took because there were two blades that got narrowed. Also, this is a trip-edge blade meaning the lowest piece you see in the pic (with the holes in it) is hinged and controlled by that spring. Bottom line...it was a lot of dickin around to get it all back together.

 I make it sound worse than it really was. Four of us did different tasks whenever we had some extra time to kill. Its not the way I normally like to do these things but its a great way to give guys experience in projects like this so they might do it on their own some day.


Later.

Sunday, November 1, 2020

New Sidewalk Rig

 At work we do snow plowing and we run a few sidewalk tractors. Last year we needed a second rig and the boss put up his Polaris Ranger. The Ranger is a nice utility vehicle but it doesn't make a good sidewalk machine. Tractors work best so this year he picked up a new John Deere 2025R. The machine needs to be tooled up for our purposes and thats a job I really enjoy. 


https://youtu.be/jo2N6wWIsbg

Later.