Wednesday, November 28, 2018

Workshop Wednesday-Brine Sprayer

 After a number of years saying we were gonna experiment with salt brine for ice control, we are finally doing it. This means we need a way to apply brine and also we need a way to make brine. The making part will come in a future post because we can always buy a tote full of brine for experimenting. We need the means of application and our first goal is to make a machine that will do sidewalks, stairs and door entrances.
 We had this Raven lawn mower that we had to buy back from a customer. Its basically a generator on wheels with electric drive and electric motors on the cutting deck. The problem was getting replacement parts to satisfy the customer. If it breaks again for us we'll just cobble something together to nurse it along. Maybe if our experimenting goes good we can look at a different rig but for now this is it.


 Another goal for this project is to do it on the cheap. We'll be using as much stuff as possible thats just laying around the shop. Lucky for us there's crap everywhere so sourcing parts is easy. The hose reel is from a pressure washer that was scrapped out. 


 Salt brine and electronics don't go well together. After the rear fender section was removed, I used rubber bed mat to enclose as much as possible to keep the brine off. The rest will get oiled down.


 This tank and pump had issues and wasn't being used. I made enough repairs to suit our needs here. The tank and framework its mounted on fold back to gain access to the engine/generator.


 The plan is to be driving down the sidewalk and spraying brine. When we get to a door entrance we can pull the hose from the reel and spray those areas. The reel is obvious here and the single spray "boom" nozzle for the walks is below it.


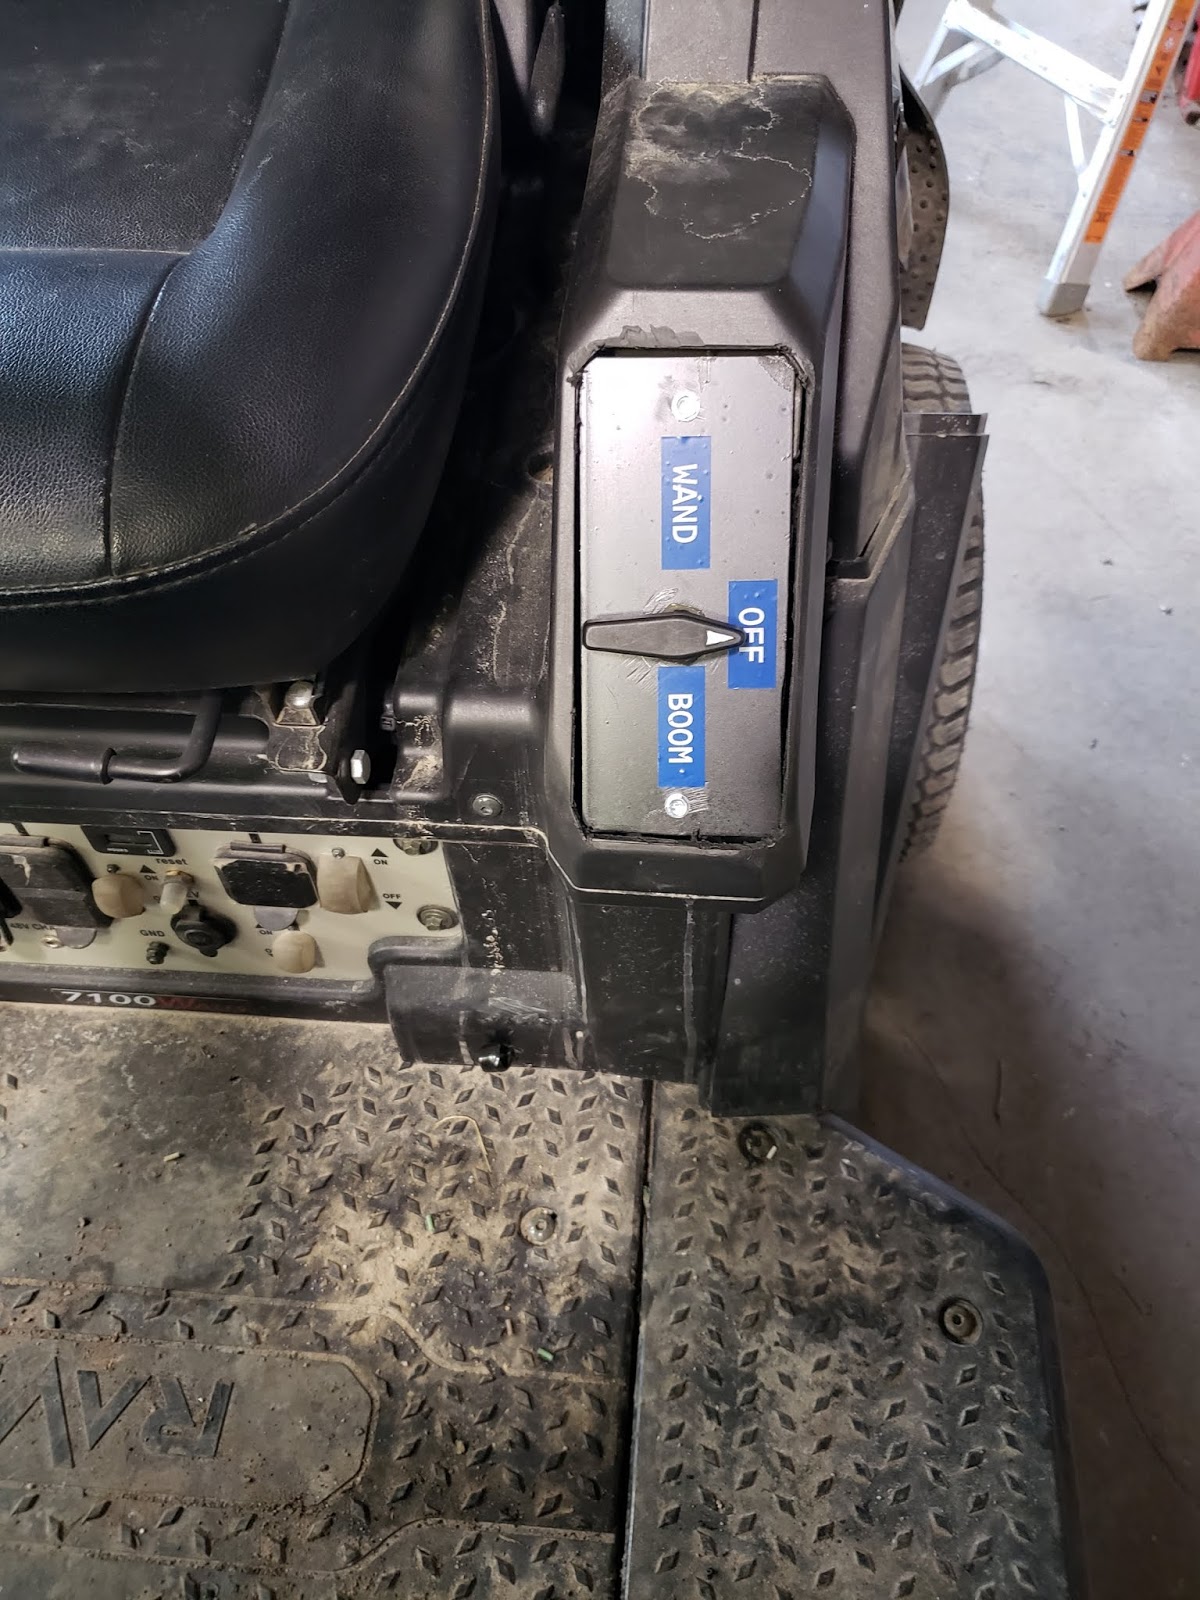
 There is a switch to power on the pump and this valve to switch between wand and boom. Some of these valves, nozzles and such are all spares from our regular turf sprayers. This week we'll be meeting with an "expert" from our salt and chemical supplier. I think we already have a pretty good idea about how to put the brine down and just need some details on adding other chlorides to our mix and at what rates. The brine maker is about half done at this point and we should be making a batch next week.

Later.


Sunday, November 25, 2018

Sweetness-Day Seven

 Flashback: My last post was all about my resolution to be nicer to others. Its not like I run around being a jerk, I just want to make a special effort to be friendlier. This is one of those things that I should have just kept to myself. It seems if I sway off the path a bit that someone will remind me. No matter, I'll kill em with kindness.
 Being nice isn't hard but why do I feel built up frustration every so often. The other day some jag off passed me with his hemi half ton. He dang near clipped the back of the beemer when he pulled out then wedges himself in my safe following distance of the car I was behind. When he pulled out and passed that car, I followed and blew his doors off. I immediately felt better. He can't pick me out in a lineup so I wasn't really a dickhead, it was just some guy in a bmw.

 I wrote that a little better than ten months ago. Its been sitting as a draft here on Blogger and is a one week follow up to this post, a new year resolution to be nicer. Have I been nicer? A little maybe for some of the year but lately I've tried to be a better example for our niece Stefany that has been staying with us for a couple months now. It seems easier to be less of a dickhead when the goal is being a good role model rather then just not pissing off some stranger.
 I know Stefany thinks she is a burden but nothing could be further from the truth. The fact is that trying to set a good example has put me back in a better place mentally and emotionally like when we had our daughters in the house. I think a better part of me left when they did. The last couple years were a free for all as far as my behavior is concerned.

Thanksgiving 2018 is in the books.

 Now before a bunch of coworkers jump on here and tell me my dickheadedness hasn't tapered off one bit, I ask you to look at the gaps between my outbursts and not the outbursts themselves. I lost it the other day when a coworker gave me shit for a big mess of water on the shop floor that came from the ride-on sprayer I'm building. I know it looked like I made the mess but the fact is that is that the boss ran the unit to check out the spray pattern. I could have calmly pointed that out but instead spewed some verbal diarrhea at him and I regret that. Hey, there's no halo and wings here, just some guy trying to get through one day at a time.
 If you're reading this then know that I probably spent a lot of time with my finger on the post button deciding if I should let my guard down. Also know that next time you see a lame post with just a bunch of pics that mean nothing, I'm probably holding back some great poem or prayer that I'm not willing to share with anyone else.

Later.

Wednesday, November 21, 2018

Workshop Wednesday-Pressure Testing

 One of the tools that not all two cycle engine mechanics have in their box is a pressure/vacuum tester. I don't know why because it is vital to diagnosing problems with these little machines. Because the incoming fuel and air charge passes through the crankcase of a two stroke, that crankcase must be sealed and not have any air leaks. These leaks are checked under pressure and vacuum with a tool like this one made by Mityvac.


 To test, we pump up 7 pounds of pressure and see if it holds without losing more than one pound in a minute. A well sealed engine will still be holding that pressure after returning from a lunch break. It will also hold 10 inHg or .33 bar of vacuum. You may think that if it passes one test it will automatically pass the other but that's not always the case. The design of crankshaft seals, with a lip on one side of them, means pressure from the inside of the case with just make them seal tighter and pulling vacuum from inside will allow the lip to give way and let air pass. This was the case the other day when I was working on a saw that was all jacked up with an engine failure in the form of a scored cylinder and piston.
 The first step is to seal all the external holes and ports. The muffler is removed and blocked off with a plate, or a piece of rubber sandwiched between the muffler and cylinder.


 The carb is removed and the intake is blocked off, in this case with special tools.


 The spark plug is removed and our adapter is screwed in place. The mityvac is then connected to the adapter.


 Yes its a lot of dickin around to do these tests but its the only way to do it right. If you're working for a dealer then it has to be done this way for filing warranty claims. It adds a lot of labor time to the repair so it usually only gets done when the repair can't be remedied by other means. This saw came in with a complaint that it wouldn't start. An engine needs fuel, compression and timed ignition so I always look at fuel quality first. Its easy to see if there is fresh mixed fuel without water in the tank. Next I pull the spark plug and take a looksee at the cylinder for signs of scoring. In this case the cylinder and piston were pretty bad.


  This engine wouldn't start because of low compression. The ring was stuck due to metal transfer between the piston and cylinder, causing that low compression. We determined the fuel supply was fresh and had oil in it and we knew the saw was still under warranty so the next step was a pressure test which it passed. When I tried the vacuum test it failed. As mentioned above that points to the crank seals. Pressure tests are checked with soapy water. If there is a leak then you'll see bubbles.


 To confirm a crank seal leak I like to use two cycle oil. I turn the saw on its side and coat the seal with oil before applying vacuum. You'll see the oil disappear as the vacuum gets stronger...


 The problem has been discovered and the repair can begin. Oh I know this is a big yawn fest to most of you but I enjoy it. Teams of engineers designed these engines to run decent and there's no reason an old one can't be repaired to run like new. It's like a puzzle and you just need to figure out which pieces are out of whack. I like puzzles.

Later.

Sunday, November 18, 2018

Rat Up Close

 I've been thinking the Rat isn't done yet, like it needs some sort of weird front suspension. I suppose I should get back to scribbling ideas and scavenging parts for it so when next years bike shows roll around I'm ready. I guess the rest of the bike could be pretty much done, but as I scroll through these pics I see some areas that may benefit from a torch, welder and grinder.


 I think one of the neatest ideas on this bike is in the above pic but most people never notice it. The handlebars exit the triple tree from the wrong sides. I should clean up all the garbage to show that off better. Actually it was an experiment that worked. I should just redo them with heavier tube and hide the wires.


 I suppose this rat face would look a lot different if I had my airbrush setup going at the time. I'm not saying better, just different.


 I wanted a 4 into one header so I built one. I'm a cheap bastard.


 I like this pic. Those fins need some attention, maybe from a grinder.


 There was a short run one year when I just threw anything laying around onto the bike. That big chain and the copper tubing fall into that category.


 The crest was fun to make. Tied down wrenches represent big ideas and little funds. Bike versus deer is all about a week I earned in the hospital. Damn forest rats. The whole crest with its shape and red/blue color represent the us interstate symbol from a time when I was into iron Butt rides.


 Someone once gave me shit about how that barbed wire was gonna tear me open if I went over the bars. If I go over the bars theres a good chance I'll already be visiting a doctor. I'm sure he'd be happy to put a few band aids on my scratches after he's set my broken bones.


 This expanded metal front fender/spider web was a challenge. Trying to bend it round in two different directions and keep it symmetrical wasn't easy. 
 I've also been thinking any effort into this could be better spent on the sportster or BSA. I guess we'll see where things go this winter.

Later.

Wednesday, November 14, 2018

Thats A Wrap

...For my riding season. The forecast was for cold and snow and that's what we got. This pic was a couple weeks ago before that snow and on the day I moved these two into the house. We ended up getting two inches of snow.


 Prepping the Rat turd was a matter of draining the gas then adding some canned fuel. I ran it for a bit on the canned stuff and then drained that. I then ran it again till it died and removed the lawn mower battery from the saddlebag. I couldn't remember if I installed that battery because my charging system failed or the stock battery just died, and I forgot to test it. Grrr.
 I didn't do anything to the sporty but push it into the living room. There's no fuel tank on it anyway and the bike didn't run all year so I'm sure the carb is dry or gummy. Either way it won't leak in the house. I feel this bike needs to morph into something a bit different but I haven't been inspired yet. At least with it sitting in the house I can gaze at it and try to figure it out. Even if I just make it road worthy for next year it will need a battery, clutch cable, headlight, turn signals, the fuel tank and seat. I can't remember if I upgraded the power switch yet so that goes on the list too.


 Most of the snow has melted already but they had salted the streets so the bikes won't see the road till spring. That seems like a really really long way away.

Later.

Sunday, November 11, 2018

New Kicks

 Oh my aching dogs! My feet were killing me and I couldn't explain why. That's a problem for me as I can't even handle a little bit of "sock slippage" without having to stop and adjust things. Turns out my steel toe boot actually has an aluminum toe and somehow it got crushed a bit. I don't remember it happening and I have to wonder if gremlins hammered on them while they weren't on my feet. If I dare stick my hand in there I can feel the whole leading edge of the aluminum toe is bent down with a more severe bend near the pinky toe. My solution has been wearing my riding boots to work all week but that needs to end or I'll wreck them, so the decision was made to buy new footwear for work.
 The older I get, the less aggressive I've been with boot selection as far as height, and construction. Lately I've been buying mid height, water proof hiking styled work boots with toe protection. I suppose the biggest reason is that when I'm "in the field" I'm not doing a lot of physical labor. The rest of the time I'm in an indoor shop setting, driving a truck or sleeping at my desk. Well not really but that's what they think so whatever.
 Also the older I get the more I want to buy an American made product. I wasn't thinking about this when I stopped at the shoe store. I just assumed I'd have that option. To assume is to make an ASS out of U and ME.


 You may or may not recognize this store. It doesn't matter and I'm not gonna say where it was because I don't want to give them an ounce of publicity. The point is that there were three or four aisles like this full of work boots and only two individual styles of boot to choose from that were made, or at least assembled, here in the USA. Even the Red Wings were the China versions. If they had more I couldn't find them and neither could the dude working there.


 I know there are other choices out there but just not at this store. Driving around all day or ordering boots online wasn't an option so I'm gonna give these a try.


 They are waterproof and steel toed so they meet my requirements. They've been on my feet about five hours as of this writing and comfort is great. I really hope these American built boots hold up at least as long as the China, Vietnam, Cambodia and Malaysia built boots that fill our stores.

Later.

Wednesday, November 7, 2018

Big Bucket Of Carbs

 In the small engine repair world, sometimes its easier and cheaper to replaced a carb than it is to rebuild it. Sometimes its necessary. When this happens I guess the old carbs could go in the scrap metal dumpster but many of them find their way into the "big bucket of carbs". I dig through this bucket every week or two looking for carb parts or screws for other repairs.


 I often wondered how many were in the bucket and after a search for a part, decided a quick count was in order. Then for whatever reason I decided it would be fun to have everyone throw a buck in the pot and take a stab at guessing how many. Winner takes all. Its not like we don't have other shit going on but sometimes you gotta take a company fiver.


 How many were there? Ill give you time to think about it while I tell you about how I hurt my arm at work. Turns out the injury came from patting myself on the back. See, our turf applications crew runs a variety of different sprayers and most of them use an electric 12 volt pump. These pumps run a lot of hours and are pretty reliable but every now and then one needs to come apart for service.


 This is the motor and half the pump. Seven of the eight screws are out but one is broken off in that aluminum housing. We already ordered a $50 rebuild kit so it was important to get that last screw out clean without wrecking the whole thing. I decided to just freehand drill the 8-32 screw with the bit needed to re-tap the hole to that size. I couldn't do it from the side where the screw was exposed because the drill chuck wouldn't clear the pump motor. This meant the bit had to pass through 3/4" of housing before it hit the screw which was 1/2" long. Good luck getting that straight, right? I guess I was lucky cuz BLAMO!


 The drill hit dead center and just left the threads in the hole. When I ran the tap through it pushed those threads out. Its not like we're working on the space shuttle here but its nice when these things turn out as planned. The pump was saved.
 Whats your big bucket of carbs guess? James won with a guess of 100. The actual total was one hundred and eighteen.

Later.

Sunday, November 4, 2018

Random Rat

 Every so often you're out minding your own business and then right before your eyes is a vision of beauty. I be like...


 What I saw was a rat bike but upon closer examination this bike is only a rat in the sense that I'm not sure what other category to put it in. If you mix steampunk, rat bike, art and imagination you end up with Rodney Millers build.


 What your looking at, and I'll probably mess some of this up, is modified Kawasaki running gear surrounding a Kubota diesel engine and honda transmission. If you look close you'll see there is very little stock anything on here. Some of the features include a frame tube exhaust system, custom rear swing arm and suspension, and a coffee pot headlight housing.
 I think Rodney said he had seven months time invested in this ride. If so, I don't think he did much else in his free time but work on his creation. And as usual, he claims its not done yet. I heard some talk of a turbocharger.
 The bike hasn't been to any shows yet so if you see it out there next year take some time to check it out and make sure you talk to the builder. The stories that go along with these builds are always the best part and I understand the state inspection was quite interesting.

Later.