Showing posts with label workshop. Show all posts

Sunday, July 26, 2020

Garage Makeover Part 6-Floor Paint

 Last Sunday I showed you that I was grinding the concrete floor in my garage in preparation for paint. My main concern was degreasing and the goal never was to have a mirror finish. I was afraid if I made the floor too smooth that it would be slippery. In fact when the grinder was leaving swirl marks in the concrete I was happy about it.  The big holes and pitting from salt damage were what I was trying to clean up and my resurfacing compound and the floor grinding did a decent job of repairing that.


  If I had to do it over again the only change would be to use more paint. Not to cover things up better but to get better coverage. Its all in the video:


Later.

Wednesday, July 22, 2020

Gotta Vent About A Fan

 Ha, gotcha! I don't have fans, just a few followers with extra time on their hands. This post is about an actual electric fan. I know, exciting stuff. Its whats going on so its what I report.
 Part of the garage makeover includes insulating the garage and that means I need to vent the attic. During this last heat wave it got up to about 1.3 kajillion degrees up there and in a sweaty panic to decide how to vent the attic I bought a power vent that came with a thermostat.


 Because the soffit on the garage isn't perforated and because I still have some big expenses left on this project, I elected to do this gable vent fan. It should work fine once I have the inlet vents installed on the other end. I installed the fan before painting the floor because I wanted to vent paint fumes during that operation. The fan worked well and I think I'll be able to use it in another way besides cooling down the attic. If I have fumes in the garage after the ceiling is installed, all I have to do is prop open the attic ladder and turn the fan on. I'm not sure how much it will draw or how fast but I'm hoping I could weld in there with the garage doors down, or one just open a little bit. We'll see.


 Installation of the vent and fan were pretty easy. The old clapboard siding was easy to access near the peak of the roof and cut like butter. I screwed a couple 1 x 4's in place and screwed the fan to them.


 And finally a shot from the outside.


 This was the easy end to install. The other end will have two inlet vents which are actually very easy to install if you can access both sides. Because the other end is over a glass greenhouse I can't access it. At least not with a ladder or from the roof. The vents are two piece and the outer piece snaps into the inner. I figure if I cut both the holes in the wall for the two vents then I can just reach out one of the holes to snap the first vent into place. The second vent is going to require some thinking. I'm treating it like a puzzle. I know there must be a way to solve the problem and I'll keep trying until I figure it out. The thing is, I need to be sure it can be done before cutting holes in the garage. In practice runs I've tried using strings to pull the outer piece into the inner piece. I keep finding myself cheating and looking at the other side to line things up. Of course I won't be able to do this if I'm inside the attic. Another option might be to somehow secure the outer half and then snap the inner half to it. I'm not sure yet how to get it done but I'll let you know when I do.

Later.

Sunday, July 19, 2020

Garage Makeover Part 5

 To be honest I really have no idea what episode this is of the makeover but 5 seemed about right. I'm still working on the floor which should be getting a coat of paint later today, for sure before the next video, so you've got that to look forward to. If you get nothing else from todays video at least be aware that if you choose to paint an old greasy, chipped concrete floor, you should be prepared for a lot of work.


Later.

Wednesday, July 8, 2020

The Warranty Process

"Its a brand new tiller and we never got it running". I enjoy a challenge but this one was easy. If you're gonna lie about it never running at least clean the mud off the tines. Now explain to me how an engine that never ran has a scored cylinder. Nobody wants to be accountable for their actions these days. Its always somebody elses fault and they will make up lies to ensure that. The saddest part is that the customer didn't have to lie. There was a legit issue with the equipment that the customer had no control over. A warranty claim was filed.


 This is typical of the kind of thing I've been seeing a lot more of lately. A person goes to the big box store, buys a cheap piece of shit and has problems. One of the problems is that they are selling "disposable" outdoor power equipment. The biggest problem is that the big box store doesn't do what a shop like ours does. At the big box stores you will get an offer to purchase an extended warranty but thats where it ends. A shop like the one I work at starts by matching the equipment purchase to the consumer needs. We set up the machines, test run them and train the customer how to operate and maintain them. Nobody leaves before all their questions are answered. I do see a problem every so often when a guy is too macho to listen to what I'm telling him, then later comes back bad mouthing the product. A good example is warm starting procedure for a chainsaw. We explained it when they bought the saw, theres a big sticker right there on the saw, but "nobody told me that". With a smile I politely point out the sticker right there on the saw is a reminder and the fact that its in the owners manual. OK I don't smile very often. In fact on the inside I'm quoting Red Forman...Dumbass! You were too smart to listen, now you're being schooled! The point is, the customer receives one-on-one help for their issues and usually leaves happy. If you ask the big box store for help on warranty issues they send you to us.
 When they are sent to us, I find people lie all the time about equipment that needs repair. Usually its because they weren't educated on the equipment and did something wrong. I don't mind setting them straight, denying warranty and writing up a bill for diagnostics even when the machine wasn't fixed. I'm not a dick about it, I just don't feel sorry for a person that brings on bad juju from their dishonesty. You'll get something for nothing if its covered under warranty. All others pay. You have to remember, the equipment manufacturers are our biggest repair customers due to warranty claims. We are on the customers side and make every claim we know will be accepted. Sometimes we can even get the manufacturers to agree to a goodwill gesture of some sort. The sad part about all of this is that it could have been avoided if they bought from a shop like ours that educates the customer. 
 Sometimes we have to educate a customer when we are explaining why they don't have a valid warranty claim. It makes me sad when I see a customer bring in all their paperwork and proof of purchase for a piece of equipment that won't run only to be denied a claim. They think it will be a free repair and then they get a bill. I have to be the dickhead that explains why. I do my best to let them down easy and be thorough in my explanation. I don't use 8x10 color glossy prints but I will show them pics from my phone. It must be a lot like seeing that the biggest package under the tree has your name on it, only to have some grumpy elf drop in and explain there was a clerical error at the main office and this gift ain't for you. 
 This happened yesterday. We've been busy so repairs are at least a week out so right away customers are antsy. I get a work order that has all the receipts and such attached and this tells me the customer isn't expecting a bill. Now the engine manufacturers have no control over what you put in the fuel tank and bad fuel isn't a manufacturer defect. A lot of people don't get that. A carb kit and cleaning labor fixed a problem with a rusty scum buildup issue in a chainsaw carb. The customer wasn't furious but he was whatever the next level of pissed off is right below that. He said he uses only premium fuel, no ethanol, and the brand name oil we sell. I told him I believed him and started asking a few questions. He told me where he buys his fuel and that he uses a one gallon can. If you deal with this stuff every day then you know where I'm going with my line of questions. This particular station uses one hose pumps. That is, whatever grade is selected comes out the same hose. I had to explain to him that he was getting at least some of whatever grade the guy before him pumped. There was a chance a good portion of his one gallon can was ethanol. Now if his can wasn't sealed tight with the humidity we've been having, theres also a good chance it was pulling moisture right out of thin air. BTW, to get around this problem, pump the first gallon or two into your vehicle before you fill your can with the good stuff.
 He wasn't happy about the situation. Heres a guy that thought he was doing everything right only to find out he was overlooking a few points. He was a reasonable man and didn't blame me for anything. In fact he thanked me for taking the time to explain everything. At the end of it all he said. " I wish I would have bought my saw from here".
 This is getting long but I have one more. A customer brings in a tiller, much like the first one I talked about. Someone must have been having a sale on crappy tillers. They never got it started and I believe them. First, if you follow the starting procedures on the sticker you will flood it every time and never get it started. Second, when I finally did get it started it wouldn't idle. It was set too low. I explained all this to the claims department of the distributor. I was talking with them because I wanted to make at least a minimal warranty claim for my time to get their piece of shit tiller running for their customer. We didn't sell the machine so we didn't make a dime on the deal but the customer was sent to us for service. He wanted to deny any claim because I told him I had to turn the idle up to keep it running. We went back and forth and both fell just short of any name calling. He did finally state he doesn't normally handle warranty claims but "Idle adjustment is clearly explained in the owners manual and the customer shouldn't have had to bring it in to you". "Oh really?", I said. "Please explain to me how the customer was supposed to know the idle was set too low on an engine they were never able to get started?" There was a long pause and then he gave me a claim number. Dumbass.

Later.

Sunday, May 10, 2020

Triple Rack Update

 Ahhh, back to work. The virus is still as real as it ever was but virus be damned! We need to get things rolling again even if in some new hybrid way. At least thats the feeling I'm getting from what I see out there. These days when I get a weird look from someone I'm not sure if cuz I'm picking my nose or just because I'm touching my face! The one thing around here that has everyone confused is the inconsistency. Some businesses require you to wear a mask, and others won't even let you in the building but just down the road some places are conducting business as usual right next to a restaurant that has curbside pickup only. Wisconsins "safer at home" recommendation runs until May 26th but based on the vehicle traffic I see out there, most people have had enough of that. All of that to say this. I wish all the mothers out there a happy mothers day but I'm hoping the families play this one smart. The last thing you want to do is pass on a virus you don't even know if you're carrying along to your dear sweet mother. I believe my kids have some kind of video conferencing deal set up to visit with my honey bunny. No flowers and kiss on the cheek this year. Happy Mothers Day Sweetums.
 Anyway I got side tracked there. I'm back to work and working out of my toolbox again. Because I've had a bunch of questions about the triple rack, I've decided to do an update. 


Later.

Wednesday, April 29, 2020

I See The Problem

 If you clicked on this post thinking I had some interesting insight on the whole virus situation and how its affecting us then you give me way too much credit for being on the pulse of this nation. This blog doesn't dig that deep into politics or anything else thats not within my six foot circle.
 I was working on a power cutter the other day. This one was brought in without the blade attachment but this is the type of saw typically used to cut concrete. I've shown one on this blog where I was cutting metal. Anyway there was a complaint that it wasn't running right. Luckily for the owner they stopped using it soon after issues started or they may have completely wrecked the saw.
 When you work on this stuff all the time its amazing how quickly you can scan over a saw looking for problems. To me, this one stuck out like a Honda at a Hog rally.


 (above pic) Not much to see here. Its a power cutter sitting on a bench.


 (does it make more sense to put the caption above or below?) My eye caught it even at this distance. To me something was out of place and there appeared to be a big clue.


 You really need a keen eye to pick it up, even this close.

 A little closer...


 Come on, its right there. I'll give you a hint. Some of the dirt accumulation pattern is a clue to the problem.


 Bingo! A loose cylinder base bolt. Actually two of them were backed out like this. Its been sucking air and creating a lean condition but somehow the piston and cylinder still look good. This saw is old but would cost over a grand to replace so we're gonna chance putting a new gasket in and see how much longer it will run. Yes it may have subjected the crank bearings to some dirt but a base gasket is cheap and labor isn't bad on this one. Actually, cleaning it up takes more time than the repair.
 Chainsaws always have a brown oily mess under the clutch cover. Weed wackers have green grass stain messes. Blowers are usually pretty clean but these dang power cutters always come in all jacked up with a big powdery mess that destroys my clothes, tools and work area. I've decided I hate working on them, even when the problem jumps out at you the moment it hits the bench.

Later.


Sunday, March 29, 2020

Hades Over My Shoulder


 Last time I told you that I was keeping busy playing with my nuts...and bolts and all kinds of other hardware that needed to be sorted. I got a lot done with that and decided it was time to start making the storage system for the trays themselves. I had a few ideas and saw a few on pinterest and youtube but nothing was jumping out at me and saying "build this style." Finally I just looked around my shop area to see what would actually work. I have this weird file cabinet that was actually the donor for the roll up door on the tool box hutch. I only keep it around because its a nice little rolling work area. A lot of stupid little projects are done on this thing when all the other flat surfaces are covered in crap.


 I decided to harvest the running gear and scrap the thing. My new cabinet could be built to replace it and also hold the trays.
 To get started with the build I would need to get a 4 x 8 sheet of 5/8 particle board up onto a pair of four foot high saw bucks. Sounds simple enough but if you have to do it without damaging any corners on tender particle board then its a bit more of a challenge. If it were even a pound heavier I wouldn't have been able to muscle it up there, at least not without a backache.


 I got to use Grandpas table saw for a few cuts so thats bonus. The rest of the semi completed project can be found on the video. Oh, the little paper mache puppet is something one of my daughters made a few decades ago. I had to contact her and ask who it was supposed to be. My wife thought Zeus but its his brother Hades. I'm just glad it wasn't supposed to be me. He's been sitting right about in that same spot all these years and I had forgotten about him until he showed up over my shoulder. I picked the phone up to take a pic, it was in selfie mode, and there he was.
 Check out the video:


Later.

Wednesday, March 4, 2020

Workshop Wednesday-Shop Life

  And now for something completely different. When I was trying to decide what to blog about for today I ran across a bunch of pics in my phone of random shop life. When I started to caption them I musta had some jams in my head and found myself using song lyrics, so lets have some fun. Try to guess the song that goes with each caption. Hint: I'm old and the songs I know lyrics to are also old. Hint two: If it ain't classic rock, it ain't shit. Be the first to guess them all and get bupkis.

Turn on, I see red
Adrenaline crash and crack my head.
Nitro junkie paint me dead.


Well every time I move, every step I make
You know I just can't seem to take, the right direction.


Nothing wrong with me, somethings got to give.


History shows again and again, how nature points out the folly of man.


Got to be a joker he just do what he please.


I killed a man on the Mexican border.


I was sitting in this coffee shop just minding my own affair, when all of the sudden this policeman caught me unaware.

Theres a bad man cruising around in a big black limosine. Don't let it be wrong, don't let it be right, Get in his way you're dead in his sights.


You can call it another lonely day.

If you get lonely on your daddys farm just remember I don't live too far


Listen kid you paid for the call. You ain't bad but we heard it all before.

 Did you get em all?

Later.


Wednesday, January 29, 2020

Playing Detective

 So this post was just gonna be some random pics from my phone of life at work. The more I scanned for shop pics, the more I found pics showing the results of detective work I've done to find running issues with chainsaws. Lets see what we've got.


 Here is a common one. Someone will come in with a saw that floods itself out. I'll rebuild the carb and when they get the bill they bitch because they claim they just rebuilt it. I state that I know it was just rebuilt because whoever did it screwed up and then I show them why. Sometimes its gaskets installed wrong but many times its because they didn't clean the protective coating from the rubber tip of the new needle valve. In the above pic, if the needle were clean it would be completely orange. "Well it was actually my brother-in law that did the work, I'll have words with him". Ok buddy, whatever.


 Two pics above, the intake manifold on the right and the cylinder on the left. I really wish the owner would have told me he put on an aftermarket cylinder before I had to figure it out on my own. He would have saved some money in labor costs. This case is something I see a lot. People pay for parts and spend time trying to fix it then bring it to a shop and pay to have someone else fix it the right way. This guy didn't save any money buying a chinese cylinder and ended up buying a new factory cylinder anyway. In the pic above you can see the port is too big and the lip of the seal hangs in the opening of the port. This creates and air leak and a lean condition that would eventually ruin the piston and cylinder if not caught early. Pro tip: if you have an unusual high idle condition and a saw that will rev really high but has no balls in the cut then shut it down and have it looked at. It most likely is running lean.


 Above is another example of an air leak/lean runner. This plastic intake manifold isn't something that a person would normally remove and look at. Because the bolts were tight and the plastic isn't warped along with this being a newer unit, there is a fair chance this came from the factory this way. While a company can have a good reputation, it is still made up of individuals that can make mistakes.


 In the above pic you can see a rubber intake boot on a concrete saw is not seated properly. It was replaced by a shop mechanic that usually works on large equipment. He was so close to getting it right. I don't think the owner liked paying his guys wages to fail and then pay us to figure it out because we get a lot of small engine work from them now.
 Most of the time these types of air leak problems are found by doing pressure and vacuum test of the crankcase and then searching for the leak. Sometimes even when you know where the leak is, it still takes some figuring out why. Factories want to know why for warranty claims and people want to know why so they can blame someone else.
 I enjoy playing detective and its a nice break in the action between the broken starter recoils, oil leakers and dirty air filter tune ups.

Later.

Wednesday, November 20, 2019

Carb Cover Pin Mystery

 So yesterday I found myself at work diagnosing a string trimmer with running issues. That in itself isn't unusual at all, it just seemed odd running a strimmer outside in the cold with snow on the ground. I determined the unit was starving for fuel which isn't unusual either due to the fact that many of my repairs are fuel related and most fuel related repairs involve lean running conditions, or a lack of fuel. The usual suspects range from a stiff metering diaphragm to a cracked fuel line or plugged fuel filter. Maybe even lack of fuel because its being displaced by water. Usually I can guess at the problem before actually finding the problem but this time just seemed different. I have a routine that I follow and the first step is to dump the fuel and investigate. The fuel I dumped out was clean enough and smelled fresh enough to trust it in the space shuttle, if it were a two stroke. For you gearheads, lets just take a moment to imagine the sweet sounds of a two stroke engine big enough to move the space shuttle. BRAAAAAAAAAAP! RING-A-DING!
 Ok, I'm back.
 I removed the fuel filter and it looked good too. Next I connect a Mity Vac where the filter was and pressurize the fuel system. It should hold 10 psi but I was having a problem. The carb wasn't holding pressure. Once removed from the engine, this is what I saw:


 For the non-gearheads I'll give you a hint. That cover is on crooked. In fact its crookeder than a second term politician.  I've seen rifle sights at the county fair shooting gallery that were less crooked. In fact, I'll bet it was something like this that inspired Chubby Checker to write that song about the Twist.


 The red arrows point to where alignment pins used to be. They are part of the casting and how or why they broke is a mystery. The screw that holds the cover on was tight and I have to wonder if it was assembled wrong at the factory. This trimmer was traded in and I think the reason was because it always ran like number 2. See, this cover seals the fuel pump diaphragm and this would explain the lack of fuel getting to the engine. No problem, I have a big bucket of carbs I can dig through and find a new cover. The new pump diaphragm will come in a rebuild kit.


 The lone cover in front of a pile of carbs. Surely I'll have a donor in here.


 No such luck. This carb isn't a common Walbro or Zama, its some other cheap brand with a name I can't pronounce without straining a tongue muscle. Like a lot of things from over seas, these are duplicates of name brand parts just built cheaper. The difference here is that they build these 180 degrees off. Oh they work the same but everything is flipped end for end or inside out or kittywampus. That means a zama cover won't work even though its the "same" carb. My big bucket of carbs has let me down and the entire carb is too expensive to justify the repair so I'll just order the cover. The boat carrying that new cover should arrive on our shores by the time the snow melts, just in time for strimmer season.

Later.

Wednesday, September 4, 2019

Cleaning The Shop

 Thats how I spent my day off. With so much going on lately I just haven't had the time to get organized so with an entire day off I decided to get started on reorganizing my work space. Part of the goal is to create space in the greenhouse for two bikes to over winter. I have that greenhouse completely empty now except for a washer and dryer. As long as I don't fill it up with other crap I'll be ok. Actually there might even be enough room to add another bike to the fleet. Ya hear that honey?
 Shelves, shelves and more shelves. Stuff needs to go somewhere and shelves work the best.


 This wall is a mess. I just keep creating flat spaces for "stuff" but end up wasting a lot of space in the process. The room is only so big and I need to make the best use of every square inch.


 The first step is moving crap out. Don't look in my garage right now, its a messy staging area.


 I should be able to tidy up a bunch of crap with these deep shelves.


Thats it for now. I went to work Tuesday and lost motivation. Maybe tonight I'll have more ambition to push on. The thing I have a problem with is getting rid of stuff. I know damn well if I throw it out I'll be looking for it in a week. That might be because I've brought it to light and am again aware of an items existence in  my shop. Another thing I'm having trouble with is throwing out stuff that I've had a long time, even if its junk or something I don't use. One example is a small boom box I bought about 40 years ago while I was in basic training at Fort Benning. Its one of those dual cassette jobs with a cd player. I had some army income and bought something I'd had my eye on. I've kept it all these years and it just keeps getting shuffled around. The antenna seems to keep getting broken and I've fixed it a few times and to be honest I think that the fm receiver is the only thing that still works. I'm sure theres some deep psychological issues to be explored here but the bottom line is that there are some things I'm just not ready to throw out yet. I've got borderline hoarders syndrome, despite the fact that a cleaner work space makes me happy.
 Oh the struggles of cleaning the shop.

Later.

Wednesday, December 5, 2018

Workshop Wednesday-Making Salt Brine

 Last time I told you about the salt brine maker I built at work. One problem I discovered was my ability to lift the unit with a forklift was limited because there was a good chance of hitting the pump with a tine. Adding one more cross piece to my erector set frame work fixed that problem.


 I had whipped up a batch the other day and discovered the unit had a few leaks that needed to be fixed. Basically when I mocked up the pvc pipes, a few had threaded connectors going to valves. After the mock up they all came apart and got glued together. I forgot about the loosely threaded ends and a bunch of stuff had to be taken apart to fix this.
 This was also a chance to clean out the tanks which had some kind of scum in them . I was surprised to discover how much undissolved material was in the tank after being in water over a day. Later I would also discover that I need more agitation in this tank.


 Everything was cleaned out and I started a new batch using the "batch" I whipped up earlier. I had to do this because that first batch was light on salt. Earlier I didn't have a way to test the specific gravity or in other words the percentage of salt in the water, but amazon came through for me and delivered my new refractometer as promised. Basically the refractometer looks like a small telescope.


You put a few drops of the saltwater on a lens and then just look into it and read the scale. This unit has a scale in percentage of salt in the water. The goal is to be at 23.3% and it looks like I nailed it on this batch.


 The time it takes me to make one batch seems to be almost double what it takes others as they report online. I'm sure this is due to lack of agitation due to the weaker pool pump we're using. Like I said last week, the pump was free. I have a few ideas for boosting agitation so I think in the end things will be alright. Yesterday afternoon I filled three totes with 250 gallons each of finished product. Is that good or bad? Don't know for sure but this whole endeavor is just an experiment anyway.
 I made a short video of whats happening here. Pretty simple stuff.


Later.

Wednesday, November 28, 2018

Workshop Wednesday-Brine Sprayer

 After a number of years saying we were gonna experiment with salt brine for ice control, we are finally doing it. This means we need a way to apply brine and also we need a way to make brine. The making part will come in a future post because we can always buy a tote full of brine for experimenting. We need the means of application and our first goal is to make a machine that will do sidewalks, stairs and door entrances.
 We had this Raven lawn mower that we had to buy back from a customer. Its basically a generator on wheels with electric drive and electric motors on the cutting deck. The problem was getting replacement parts to satisfy the customer. If it breaks again for us we'll just cobble something together to nurse it along. Maybe if our experimenting goes good we can look at a different rig but for now this is it.


 Another goal for this project is to do it on the cheap. We'll be using as much stuff as possible thats just laying around the shop. Lucky for us there's crap everywhere so sourcing parts is easy. The hose reel is from a pressure washer that was scrapped out. 


 Salt brine and electronics don't go well together. After the rear fender section was removed, I used rubber bed mat to enclose as much as possible to keep the brine off. The rest will get oiled down.


 This tank and pump had issues and wasn't being used. I made enough repairs to suit our needs here. The tank and framework its mounted on fold back to gain access to the engine/generator.


 The plan is to be driving down the sidewalk and spraying brine. When we get to a door entrance we can pull the hose from the reel and spray those areas. The reel is obvious here and the single spray "boom" nozzle for the walks is below it.


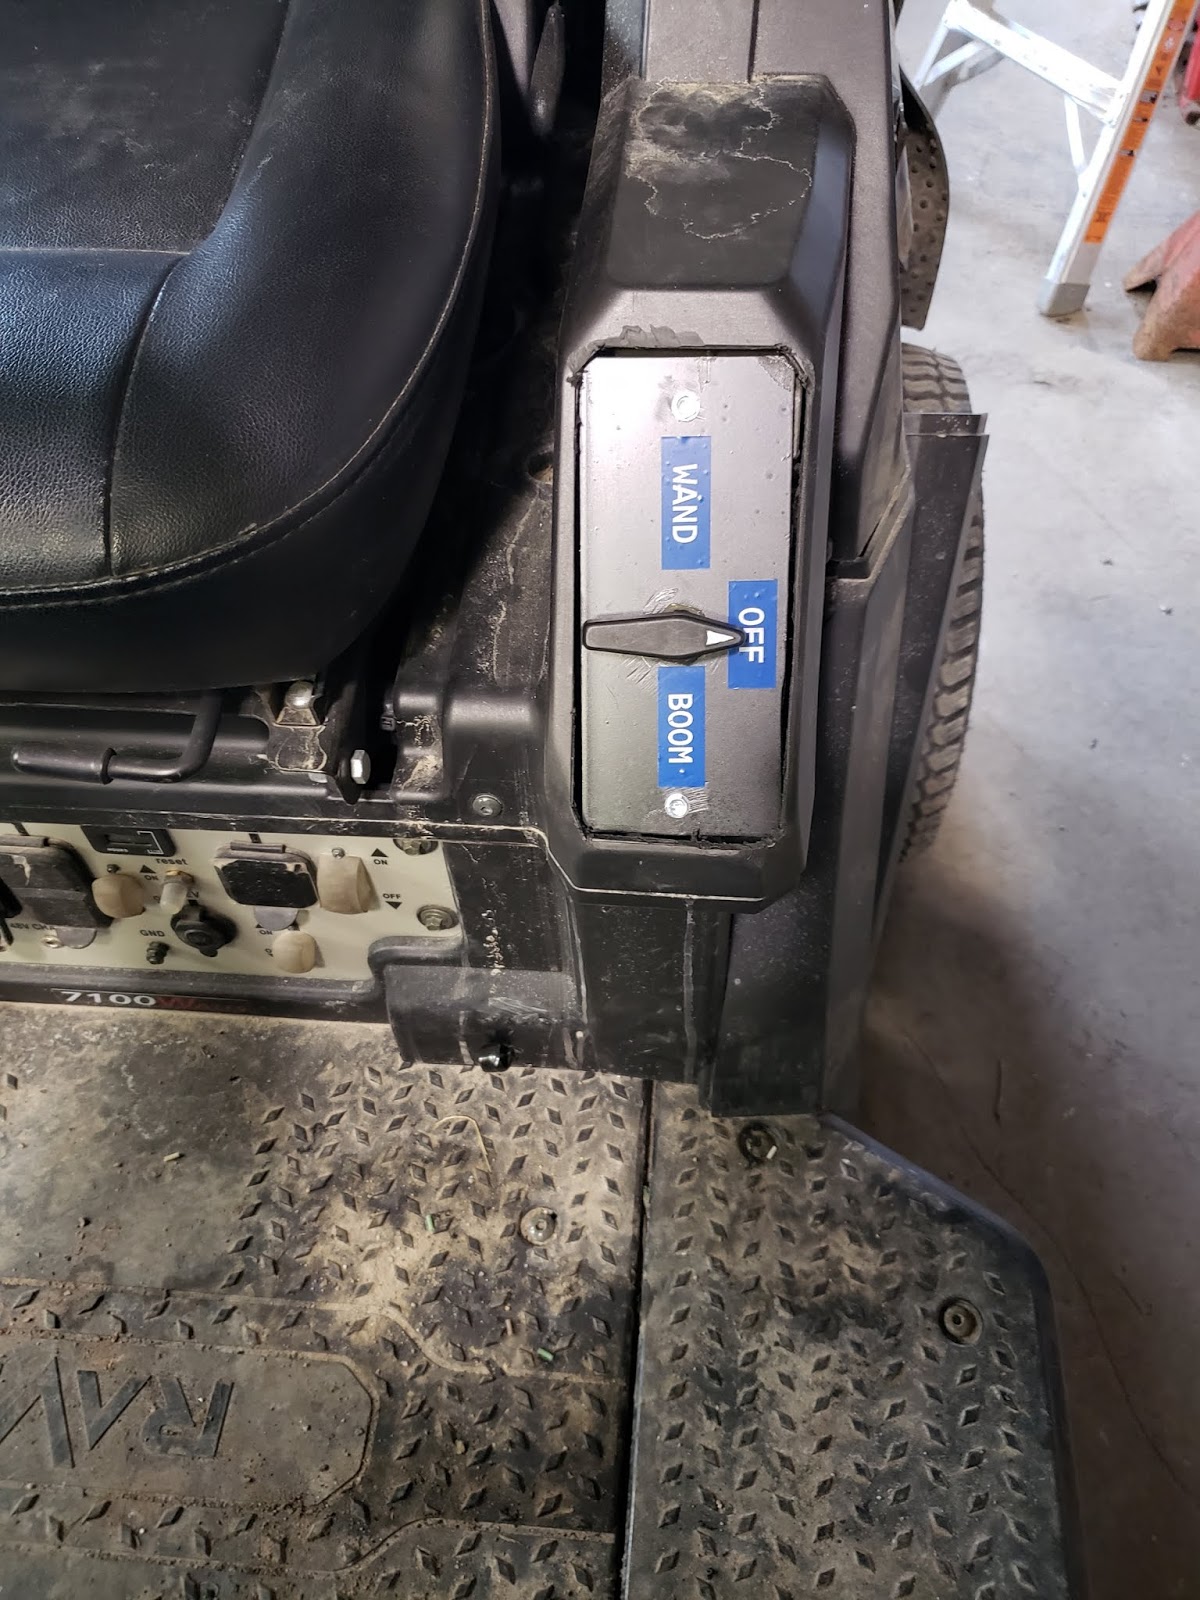
 There is a switch to power on the pump and this valve to switch between wand and boom. Some of these valves, nozzles and such are all spares from our regular turf sprayers. This week we'll be meeting with an "expert" from our salt and chemical supplier. I think we already have a pretty good idea about how to put the brine down and just need some details on adding other chlorides to our mix and at what rates. The brine maker is about half done at this point and we should be making a batch next week.

Later.