Showing posts with label kz550. Show all posts

Sunday, October 2, 2016

Funny Noise

If you pay any attention at all to this blog then you remember me saying the sporty was making a weird noise.

 I suspected the noise was coming from behind the primary cover so one night after work I tore into it. What I found was a suspicious clutch hub bearing. The bearing was replaced, everything bolted back together, the chain was adjusted and then the primary case was refilled with B&M trick shift fluid. This is the same juice I had in there before because the clutch manufacturer recommends it. The good news is that the noise is gone. The bad news is I have a new slight squeaking noise if I launch the bike hard. I guess I'll have to limit the burnouts, wheelies and stop light racing for a while.
 Today is the Slimey Crud Run and I plan to ride the sporty unless the forecast is for weather more fitting for a bike with a windshield, heated seat and grips. I was supposed to meet Dan this morning but something came up so I'm on my own. There's no real plans other than that so we'll see how it plays out.

 I'm still experimenting with the GoPro and not having a lot of success. I guess I'm ok with the video but I need to work on the audio. Here is a few minutes of a ride I took on the Rat Turd when I went to the Watson Street bike show.


Wednesday, August 31, 2016

Workshop Wednesday-Potpourri

 There was a rare sighting today at work in the form of a Rat Turd. That's right, for the first time this year that bike was able to complete the 18 mile trek from home to work. Two previous attempts resulted in me having to turn around and grab a different scoot because of mechanical problems.


 I have been riding the Ultra lately and the sportster before that and I had forgotten how much attention this bike draws. I kept getting reports from coworkers about people taking pics or kids checking it out. Cool, but I'm ready to take it to the next level...only I don't know what that means. It'll come to me one day and you'll be the first to know.

 In other news, we had some problems with an antiquated phone system at work but got that all sorted out. "Can you hear me now?"

 Back on the topic of rodents, this poor bastard didn't make it. Its not uncommon to find a carcass or a nest under the cowl of a lawn mower engine. Its also not uncommon for an engine found this way to develop valve or head gasket problems because it over heated.

 And another pic of some animals that will pack away whatever is put in front of them.

Later.

Sunday, August 28, 2016

A Matter of Flow

 Yesterday I found an elusive spare hour in my regular schedule of eat, sleep and work, so I used it to mess around with the Rat Turd. Lately I've been thinking a fuel flow problem might be causing the running issues I've had on the hiway. One possibility was the fuel tube that feeds the bank of four carbs. At one point it was leaking so I epoxied it in place and I thought there was a chance I fouled that up. After a little testing I decided that wasn't the case.
 The next place I looked was in the fuel petcock. A lot of people claim that Kreem tank sealer doesn't work well, comes loose and plugs things up. I wondered if I was having an issue with it but nope, I was just having a problem with a small chunk of rubber stuck in the petcock. I still haven't decided where this debris came from.

 While I had everything apart I figured it was a good time to make efforts to not only clean but to improve fuel flow.

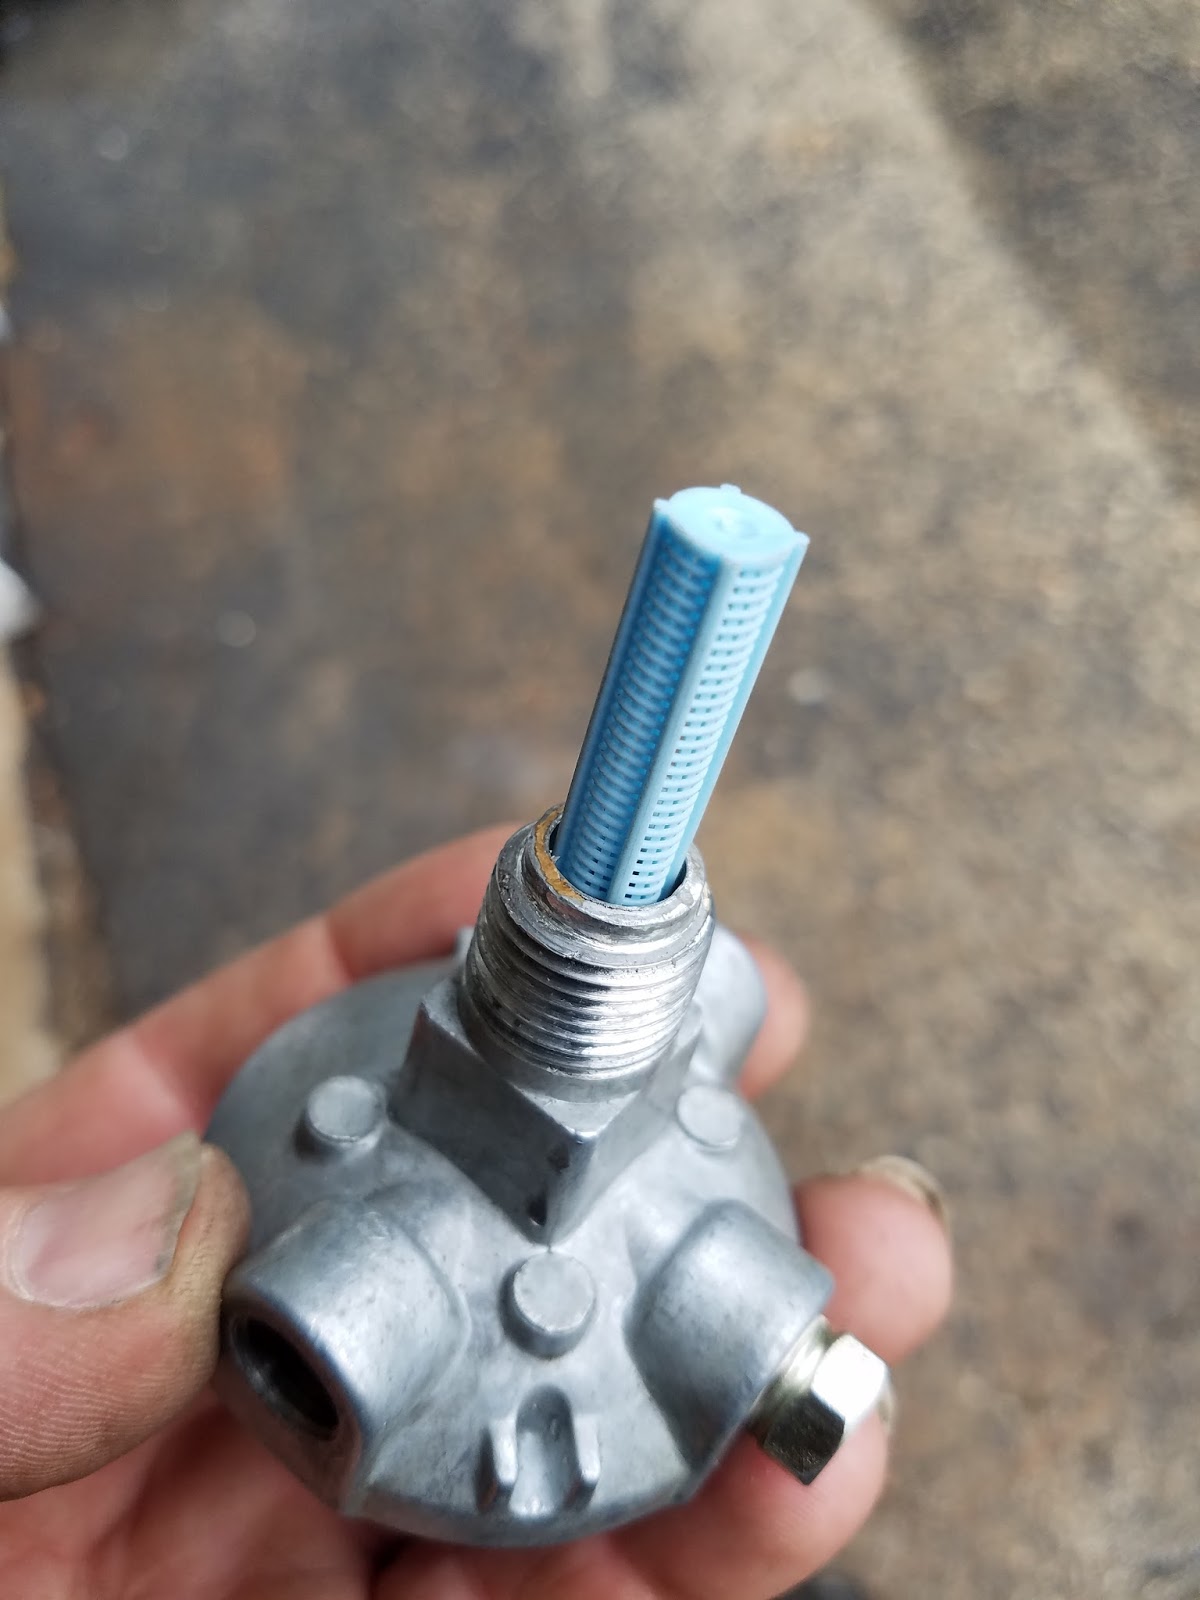
 I just didn't think this little hole was enough to feed four hungry carbs at full tilt so I drilled it out. Now at least the input, output and passages in and out of the bowl are all the same size. I also needed to pre-filter the fuel before it got to this point and the mesh that covers the bowl. To do that I used a filter from a sprinkler head.

 I'm not sure how well this plastic filter will hold up in fuel but because I have a whole bag of them and they fit nicely I'm willing to try.
 So that's it for now. Once I get motivated today I'll try the bike to see if I was successful. Confidence level is 4 stars out of 5 so I won't even hook up the trailer before I leave. I hope that doesn't come back to bite me in the ass. If it fails, I don't have a plan B so I'd have to rethink the whole problem.      
 My plan earlier this year was to have the BSA ready for the Watson Street Classic Bike Show on the 17th of September. The chances of that happening are about the same as monkeys flying out of my butt or winning the lottery so this bike needs to run. What's the point in having it if I don't let people laugh at it? Worse case I'll take one of the other bikes just to support the cause.

Later.


Wednesday, April 27, 2016

Rat Piss

 Well I finally pushed the Rat Turd out of the living room. The slimey crud run is this weekend and I want to ride this bike down there. Problem one, the battery is dead. Not really a problem, I have many different forms of electron rejuvenation devices so I connected one in anticipation of firing the bike up and taking it for a spin. Problem two, the bike pissed all over the garage floor. At first I thought one of the four carbs just had a hung float and after a few taps with a hammer would let loose and set the needle. A few taps didn't do it and before I could find a bigger hammer I came to my senses and looked for another reason for the leak.

 I knew the carbs would need to come off so this seemed like an easy way to pinpoint the source of the leak. Sure enough, I discovered fuel flowing from the inlet tube that connects the two middle carbs.
 The o-rings were getting old and just weren't sealing well anymore. I suppose they got lazy enjoying the good life in my living room all winter. I tried new o-rings but the ones I had were just a tad different sized and after reassembly proved they wouldn't seal the leak. I disassembled the whole mess again and tried some gasket sealer on the o-rings. A day later I turned the fuel petcock open and watched the rat piss on the floor again. If I'm gonna run this bike two hours from home this weekend then I need this leak fixed. I made a command decision and used JB Weld on the cross pipe. Right or wrong, it's done. The leak is fixed.
 Problem three revealed itself on the test ride. The clutch slips. This isn't a huge problem and if I were riding alone to the crud run I would be ok. The problem only shows itself when I really get on it and I assure you if I ride two hours with guys on bikes twice the displacement that I'll be "getting on it" more than once. I knew about the clutch last year after I rejetted the carbs and gained a bunch of power. The new discs are here in my shop and I just need to remember to pick up some oil and soak them overnight before I do the repair.
 Despite the fact that its only 35 degrees, the plan is to ride the Ultra to work today and pick up that oil. After work I'm gonna ride to the HD dealer in Beaver Dam because their website says they are stocking a battery I need for the heated jacket liner we bought for my wife this past weekend. This will be the maiden voyage for the new handlebars on the Ultra so I'm kinda looking forward to that. Tonight I'll soak the clutch discs and do the repair on thursday. This gives me two days to test ride the Rat Turd locally before sundays ride.
 It all sounds good to me.
Later.


Sunday, April 24, 2016

Bacon

 I was working in the garage last week putting some new bars on the Ultra when my wife walked in with a bacon snack. I submit to you, it don't get any better than this. Motorcycles and bacon!

 I'm smiling on the inside. Really. It was my first selfie with the new Samsung s7 Edge and I was reading the different functions on the screen when I hit the shutter.

 The other day I rolled the Rat Turd out of the house and put some fuel in it. The fuel leaked onto the ground. At first I thought the float was sticking on one carb but after disassembly and cleaning, it turns out the problem is bigger than that. I'll have to pull the bank of four carbs apart and try to find a leak in the fuel connector pipe that is pressed in between the middle two carbs. I've had those carbs off so many times I bet I can do it blind folded and I might just try that to take some of the monotony out of the task.
 Two posts ago I mentioned the frame on the sportster was holding up well where it had been welded. I inspect this area regularly and it appears to have cracked again. I'll probably just weld it and run it for the summer. Actually, as soon as I get out on the Ultra, the sporty will have served its "rat bike, salt on the road" purpose for the season. I know what I have there and that bike may be a winter project for next year...provided I actually finish the BSA.

Sunday, November 1, 2015

Proper Bike Storage

 I talked about storing the Rat Turd in the living room of our house and now the deed is done. Getting it in there was a bit more of a chore than just rolling it in place because the bike is kinda fat with the storage rack on the back and large saddlebags. The upright muffler is actually angled away from vertical and that along with my drink holder on the other side make the bike a bit too big to fit through three of the four doorways it would have to pass.

  I had to remove the saddlebags, drink holder and muffler. The muffler may have been ok on there but I was worried about the barbed wire scratching a kitchen cabinet. So, from the garage I passed into my workshop then down a step into the laundry room. I then needed to go up a step, through a glass door and into the kitchen. It was at this point I discussed with my wife how much easier it would be to just fire up the bike and ride it into place. Lets just say it was decided she would just help push the bike up the step. Thanks Honey.
 After navigating between the kitchen counters and taking a left hand sweeper around the dining room table it was time to enter the living room and push the rat up onto an elevated section that just happens to be the right size for displaying a bike.


 This will be the home for the Rat Turd this winter. It's not an ideal situation because I would like to periodically work on the bike and I won't do that in the living room. What I can do is spin my recliner around, tip back a few brewskies and think about what changes I can make for next year. I've mentioned in the past I want to change the front end but I'm not sure how. Hopefully those brewskies will help me come up with something funky.

Wednesday, September 16, 2015

Rat Bling

 This summer has been all about the new Ultra Limited. My wife and I have been enjoying getting out on the bike and that means the other bikes get less attention. With an upcoming bike show I needed some time to prep the Rat and I used Labor Day as that last ditch effort.
 I didn't get a lot done. I kept getting side tracked. I did manage to tie up a few loose ends like painting the fuel cap, touching up some paint on the engine and fix a fuel drip that was starting at the sediment bowl where I forgot to seal a fitting.


  Part of the fun of this bike is that I can just do whatever I feel at the time. If I don't like it I'll grind it off and do something different. If you zoom on this pic and are familiar with the bike then you'll notice some extra bling on the muffler, exhaust pipe, side of tank and gas cap.
 The bike is kinda getting away from me. What I mean is that I'm just starting to bolt crap on it. Whatever crap is laying around. People are even giving me crap and suggesting it would fit the Rat Turd. I guess it doesn't matter but I still want to come up with an idea for a unique front suspension setup. I have a couple ideas floating around upstairs but nothing definite.
 If you have nothing planned on saturday why not come to the Watson Street Classic Cycle Show in Ripon. The car show is also going on and there are a lot of cool local rides on display.

Sunday, August 30, 2015

Filthy Disgusting Pigs

 A couple weeks ago I talked about the fuel tank I made for the Rat Turd. Earlier this year I also showed you the homemade header I welded together. When I took the Rat for a test ride after these mods I was disappointed with the performance of the bike. It was jetted lean from day one and always had to be choked for many minutes before it would idle on its own. Now with the free flowing exhaust and no restrictions, it wouldn't even accelerate to 55 mph.


  The plan was to drill out the jets to compensate for the air filter pods and header. The problem was I didn't know how big to drill them and I didn't want to pull the carbs, test run and repeat a bunch of times.


I decided the best thing to do was ask Greg, our 4 stroke tech at work, what his opinion was. He has a lot of experience working on these disgusting pigs that swim in their own filth and I respect his opinion even if he is a young whippersnapper. I described the way the bike was running from startup through hi gear complete with sound effects. Bwawp burp chug. He asked a few questions and I filled in the blanks with more vroom vroom noises. As he handed me a set of tiny drill bits he told me to find the size of the jets and go up two bit sizes.

 I did as told and put the bank of carbs back on the Rat. Upon first start with a stone cold engine the bike fired right up. I immediately noticed the bike didn't need as much choke I and was able to let it idle on its own in less than a minute. Once on the road I could tell the bike had more power than ever. The problem was that all this new power revealed another problem I didn't even know I had. The clutch now slips when I crank the throttle open. It's always something. I have enough bikes in the garage that I'll probably save the clutch for a winter project. It will be good enough to get me to the one bike show I plan to attend with the bike.

 In other news...I whined last week about the customer service from J&P Cycles.

 It turns out someone in the marketing department over there found my blog and wanted to correct the situation. They said I would receive that gift card soon and in fact I had it in days. They went out of their way to make it right and I respect that. We all make mistakes or run into problems but the bottom line is to make it right. I'll give them another chance.

Sunday, August 9, 2015

Plumbing

 I showed you the Rats new fuel cell after it was coated in bedliner and wrapped in barbed wire. I did a little messing around on the front of the tank frame to outline the rat.


 I just took some rat colored paint and sprayed the front of the mount. I did a little drawing with a sharpie to detail the rat. It doesn't pay to redo it because that's about as skilled as I get when it comes to drawing rat faces.


 So the front tank drains to the rear tank through the hoses on each side of the tanks. I figure when  I can no longer see fuel in that hose I'm on "reserve". The hoses on top of the rear tank run up to the filler neck and also show fuel just before the tank is full. Pretty handy at the pump. This pic doesn't show the vent in the cap or the plumbing from the sediment bowl to the bank of carbs.


 I really didn't like the hoses. I changed them to clear ones.

 So here is the bike as it sits now. You'll notice I also wrapped the muffler with barbed wire. It wasn't as bad as wrapping the fuel tank but still a pain. I scratched the shit out of the paint on the muffler. I think once all the scratches rust it will look ok. About the exhaust...it flows way better than the stock carb jetting will handle. I'm gonna have to rejet.
 As I look at this pic I realize I have made a lot of changes to this 31 year old bike. Tank, seat, fenders, rear frame, hand made header and crossover handlebars. I still have a few plans for it including a different front end. Stay tuned.

Wednesday, August 5, 2015

Rat Tank

 I've been posting a lot about being on the road with the new bike. That's true but I've also been finding time to work on the Rat Turd fuel tank.

 Here I'm slapping a fresh coat of bedliner on the tank. It actually welded up pretty decent and could have looked respectable with standard paint but I wanted to keep the same feel I have on the rest of the bike with the Herculiner coating. The one and only time I'm outside working with my slippers on and the wife snaps a pic. Oh well.


 Any pussy can add a barbed wire pin stripe. Try adding the real thing! What a pain in the ass. I want to say "never again" with the barbed wire but I still have a piece of the exhaust I want to wrap.


 I'm not gonna wrap the smaller tank. It's way too close to the family jewels and I don't want to tear every pair of pants I happen to be wearing when I ride this bike.

 So far I'm happy with the tank. It certainly is a one of a kind piece. Ya I know it's a little goofy but that's the whole point. It's nice to just do whatever I feel on this bike and not give a shit about what it looks like.
 Btw, I upgraded this HP laptop from windows 8.1 to windows 10. So far it has been the worst computing experience of my life. I've thrown away laptops that ran better than this. I had to finish this post on a trusty old relic running xubuntu. Later.

Sunday, March 22, 2015

All Tanked Up Again


 Last week I showed you the backbone for my new fuel tank. This week we'll look at the tanks themselves.


 This tube would have represented the entire finished volume of the new tank(s). Six inch diameter and thirty six inches long. That will give me just over a gallon more than my stock tank. You see here I'm making the first of two cuts in the tube. A later design change will only use two of these tubes.


 I cut out end caps for the tubes out of some scraps of steel. They will need some grinding to get them close enough to size to fit the tubes.


 This is the new tank(s) mocked up. The project has been sitting like this for about a week. I got side tracked. I also wanted to let this soak in a bit and toss around some ideas about how to proceed. One thing that I'm thinking about working into the design is a new place to mount the key switch. The reason for this is that a future project will probably be building a new front end for this bike. If I move the key off of the forks, my new front end will be just that much easier to build.


 Just for fun I've added this pic of my original design. I like the look of the three tanks but that small tank is just a little too close to the seat and doesn't allow me to slouch if I want to.


 I already had the tube cut so I thought about using it somewhere else. This would be doable but I can't stand the way it looks (as if the two tank design is appealing). As I write this and look at the pic, I'm thinking a smaller diameter tube on top might not look too bad.

End.


Sunday, March 15, 2015

All Tanked Up

 I've been talking about making a fuel tank for the Rat Turd for a long time now. Well, I finally found some scraps layin around that I think will make a tank unlike many others.


 This was the pic I was working off of. With the bike against a white background I was able to print out a few pics and start doodling. What I came up with was an idea to run three separate tanks. Round tubes running sideways rather than front to rear.
 In the search for parts I heard a lot of "why don't you just..." or "wouldn't it be easier to..."
I would stop them right there. I don't want it to look like everything else. My goals were to have something unusual, functional and at least the same capacity of the stock 3.2 gallon tank.

 I needed a main backbone to support the tanks. My usual approach to something like this is to make a cardboard template.


 This is the design I started with. This plan would have had three tanks with a total capacity of 4.4 gallons. I was happy about the volume but it looked so bad that even I couldn't stand to look at it. That's sayin a lot. My new plan will be just two tanks for a capacity of 3.5 gallons.
 As long as I was gonna have to cut this thing out with the plasma cutter I figured I might as well personalize it a bit more. Instead of just ending the bracket at the front I thought it would be interesting to stretch it forward a bit to cover some ugly wiring and modules and junk. You can see I added an outline of the rat from my stickers which I will paint later.


 Here is the inside of one half of the bracket cut out of a plate of steel. The round black piece is the rubber mount from the bike frame. I've cut a small strap and bent it so it will fit around the mount. It's welded to the plate and this is how the front of the tanks will attach to the bike.


 The two plates welded together and temporarily bolted down. The rear brackets bolt down with the original bushings in the factory location. I have no doubt this will be plenty sturdy for my new tanks. That's all for now. Next time we'll take a look at the tanks and maybe some plumbing.


Sunday, March 8, 2015

Rat Turd Exhaust-Live!

 It's been driving me crazy. As you know a while back I built a homemade header for the Rat Turd. What would it sound like? Would it sound like a turd? Would the rain flapper go klinkity klink when the bike was idling? Well with the weather as cold as it's been and the fact that I have other things torn apart on the bike, I finally got a chance to push it outside and fire it up. You be the judge.


 I like it. It sounds like a big throaty four cylinder jap bike. Not the little 550 that it really is. I also got the rain flapper klinking noise I was hoping for. It's actually a lot klinkier than the video reveals.
 I still have to seal the elbow below the muffler. I hadn't done this yet because I didn't know if I was gonna get the sound I wanted. I was happy to see that when I held the rain flapper closed the only place it leaked was at this elbow. My header collector seems to be welded up tight. Schwinnggg!


 I still have the restrictor that came with the muffler. Of course it was removed before I ever started this project. Now I may use it to fine tune the sound and klinkability of the rain flapper.
 I sat on the bike and revved it up a few times. I think it's gonna be alright. The outlet points away from me just enough so I won't be breathing rat fumes yet it's close enough for me to enjoy it. The fact that it points up may lessen the offensiveness of it's tone. I'm not gonna get into the whole "loud pipes save lives" debate. That's not why I built it.
 So it looks like this project is a success and fine tuning it will be simple enough. For that it gets the Greasy Shop Rag stamp of approval.

Sunday, March 1, 2015

Hiway Bar Shifter

  Ya know how sometimes ya get comfortable on the bike and just don't want to change positions yet? I get this a lot when I'm eased back on the Rat Turd with my feet up on the hiway pegs. The bike has a small engine and sometimes I need to grab a gear or two to properly blow off some cager in my way. This has meant lifting my foot off the peg, finding the shifter down on the side of the bike and making the gear change down and then later back up. Oh the horror having to deal with this! I need a rat with the proper propulsion system.
OR...
 I can just make a shifter up on the hiway peg. To do this I needed to dig into my stash of lawn mower parts that just seemed too good to throw out. I had a forward/reverse pedal from a Yazoo mower that seemed like it would make a good heel/toe shifter.


 First I needed to make a bracket the shifter could rock on. This was a simple matter of welding a bolt to a piece of steel that I drilled a few holes through.


 Here is the Yazoo shifter in place. The way I have it mounted under the foot rest means I will have to make an intentional effort to change gears. I don't foresee any accidental shifts.


 I needed to get the shift linkage to change direction so that pushing down with my toe will result in down shifting. To do this I found an old rear chain sprocket from my Aprilia. Making this piece part of the linkage is very cheezy so naturally I went ahead and made it work.


 Down on the shift lever I just bent a rod and welded it to the foot shifter. The long shiny shift rod is a piece of steering linkage from a Husqvarna lawn mower. I have a few left if you need one.

 I just need to throw this in here so my wife can better understand some of the uses of the 10 ton porta-power she bought me for my b-day. If you look two pictures up you can see a steel bracket I made. It's above the rusty round transmission end cap. I had overbent the piece trying to get it lined up just right. In the above pic you can see me using the hydraulic spreader to bend it back into shape. Thanks again to my wife and kids for the tools!


 So there it is. In your face low budget rat shit. I'm not sure what's next. I still want to make a fuel tank but I don't have the material yet. What I mean is I haven't found any junk laying around that will work. I do have to relocate one of the air horns now that my new shift linkage is in the way. Maybe I'll work on that next.

End.

Sunday, February 22, 2015

Seal Puller

 The Rat Turd had developed another leak and although it's a rat, I won't tolerate a leaking motorcycle. In this case it was the shift shaft seal. A new seal was still available from Kawasaki, now all I had to do was remove the old seal. Larger seals are easy to remove with a screwdriver or seal puller but small seals can be a challenge.


 I decided to modify a screwdriver into a small seal puller. Oh I'm sure there's a fancy tool in the Snap-On catalog but this works on a budget.

 Just slip the tool under the seal lip and pry. Care must be taken not to scratch the sealing surface of the shaft.


  So big deal. Who gives a crap about a leaky seal? Well I'm writing this to help myself work something out. The cover that goes on this left side of the engine supports that shift shaft. You can kinda see the shiny area on the shaft in the above picture. I don't want to run with the cover. The exposed transmission without the cover looks more mechanical and appealing to me.


 Here is the unpainted exposed transmission.  I needed to make a new support for the shift shaft but didn't want to dink around measuring out and creating a fancy bracket.

 Here you see the new bushing I drilled out to fit over the shift shaft. That raised boss with threaded hole to the left is where the bushing will be supported from. So in true cheap ass greasy shop rag form, I just bolted a slug to the raised boss then laid a piece of tubing on top of those two and welded it all together. Simple and very rat-like.


 This leads me to my next project. I want to add a foot shifter to the hiway peg. I thought about a hand shifter but right now I'm thinking foot. Having recently made a header that moves all the exhaust system to the other side of the bike, I now have plenty of room for this project. I won't go into details as I don't have any idea yet how I am going to do this but I can say that I have a small collection of free lawn mower parts I want to use.

End.


Sunday, February 15, 2015

Rat Turd Exhaust

 Last week I told you about my homemade headers. This week I'll follow up with the rest of the exhaust system.

 Here you can see I routed all the head pipes to the right side of the bike. I built a collector and added a piece of 2 1/2" pipe to that.


 I was out of oil and didn't have any in the engine at this point because I had just sealed up an oil pan leak. Too bad because I wanted to hear how annoying this open pipe would have been.


 Here is the fart can I bought from a co-worker that needed the $20 more than I did. I put a rain flapper on top of the 4" outlet. My hanger bracket is mounted from the same hole the stock muffler was bolted to. The bracket is strong and cheesy, just like a rat bike bracket should be.


 Why is it crooked you ask? Well if it were straight there is a good chance the exhaust would blow right up into my helmet. I'm goofy enough breathing clean air, you don't want me on the road all hopped up on rat bike fumes. Another reason the muffler is on an angle is because I wanted it to be perfectly vertical when the bike was on the side stand. I don't "look" at bikes while I ride them, I look at them sitting still. I think it will look better this way.
 I'm not completely thrilled with the rain flapper and may swap it out for a 45 or 90 degree tail pipe facing to the right side. Once I get the bike outside and fired up I'll decide. If the flapper doesn't bounce at idle or make that cool clinking noise then I may just remove it in favor of an elbow.

End.